Table of Contents
There’s something extra special about making a quilt for your baby. Unlike store-bought blankets, a handmade quilt carries love, creativity, and personal meaning stitched into every piece of fabric. For teen parents, baby quilt patterns are not only a fun DIY project but also an affordable way to create a cozy keepsake that your little one can treasure for years.
Quilting might sound complicated at first, but the truth is many baby quilt patterns are designed with beginners in mind. From simple patchwork squares to cute appliqué animals, there’s a style to match every taste and skill level. Plus, working on a quilt can be a calming, creative break from busy parenting routines — while producing something beautiful and useful for your baby.
In this guide, we’ll explore why baby quilt patterns are perfect for teen parents, share popular designs, walk through the basic steps to start quilting, and give you creative ideas to personalize your project. Whether you want to make your baby’s first quilt or a thoughtful handmade gift, this guide will help you get started.
Why Baby Quilt Patterns Are Perfect for Teen Parents
Creating a baby quilt might sound like a big project, but it’s surprisingly manageable — especially with beginner-friendly patterns. For teen parents, there are several reasons why baby quilt patterns are an ideal choice:
- Affordable and Budget-Friendly
Buying a store-bought quilt can be expensive, but making your own allows you to choose fabrics that fit your budget. You can even repurpose old clothes or leftover fabric scraps to create something unique and meaningful. - Personal and Sentimental
A handmade quilt carries a special touch that no store-bought blanket can match. From choosing colours and patterns to adding initials or appliqué shapes, your quilt becomes a keepsake filled with love and memories. - Beginner-Friendly Craft
Many baby quilt patterns are designed for beginners. Simple patchwork squares or pre-cut fabric kits make it easy to start, even if you’ve never sewn before. Step-by-step instructions guide you from cutting fabric to finishing touches. - Creative Outlet
Quilting gives teen parents a chance to unwind and express creativity. Selecting colours, patterns, and textures can be a fun and relaxing way to spend time while preparing something useful for your baby. - Practical and Useful
Beyond being beautiful, quilts are functional. They can serve as tummy-time mats, stroller blankets, or nursery décor — providing comfort and warmth for your baby every day.
✨ Quick Tip: Start small with a simple design, like a patchwork quilt, and gradually experiment with more detailed patterns as your skills grow.
Popular Types of Baby Quilt Patterns
Choosing the right quilt pattern can make your project easier and more enjoyable, especially for teen parents who are just starting out. Here are some of the most popular and beginner-friendly baby quilt patterns:
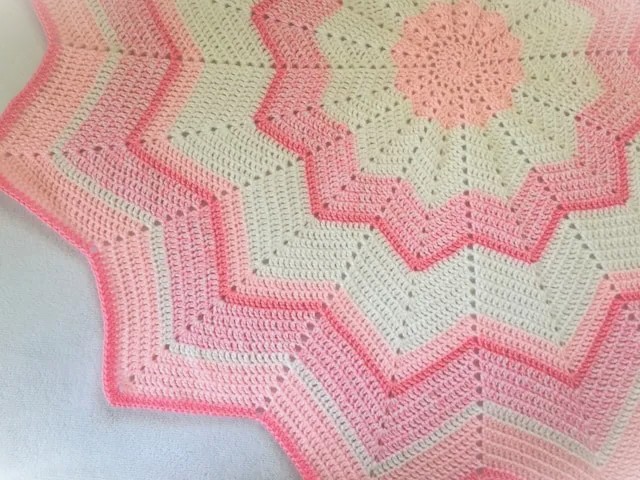
Patchwork Quilts
- Description: Made from simple squares or rectangles sewn together in a grid.
- Why it’s great: Perfect for beginners because it requires basic sewing skills.
- Creative tip: Mix and match colourful fabrics or use themed prints (animals, stars, or geometric patterns) for a playful look.
Appliqué Quilts
- Description: Features shapes or designs (like hearts, stars, or animals) sewn onto a quilt background.
- Why it’s great: Adds personality and a handmade touch.
- Creative tip: Personalize with your baby’s initials, birth date, or favourite motifs.
Modern Minimalist Quilts
- Description: Simple, clean lines with neutral or soft colours.
- Why it’s great: Perfect for stylish nurseries and for teen parents who prefer subtle designs.
- Creative tip: Use contrasting textures (smooth cotton with soft fleece) to add visual interest without complicated patterns.
Memory or Scrap Quilts
- Description: Quilts made from old baby clothes, t-shirts, or fabric scraps with sentimental value.
- Why it’s great: Combines creativity with nostalgia, preserving memories in a functional way.
- Creative tip: Add small labels or embroidery notes to record the story behind each piece of fabric.
✨ Quick Tip for Teen Parents: Start with a patchwork quilt if you’re a beginner. Once you feel confident, try adding appliqué or creating a memory quilt for a personal touch.
Step-by-Step Guide: How to Start with Baby Quilt Patterns
Starting your first baby quilt may feel overwhelming, but breaking it down into simple steps makes the process fun and manageable. Here’s a guide tailored for teen parents and beginner quilters:
Step 1: Gather Your Materials
You’ll need:
- Fabric (cotton is ideal for babies — soft, breathable, and easy to wash)
- Batting (the soft inner layer for warmth and thickness)
- Thread (matching or contrasting)
- Sewing machine or hand-sewing tools
- Scissors or rotary cutter
- Pins or clips
- Ruler or measuring tape
✨ Tip: Pre-cut fabric squares or beginner kits can save time and make layout easier.
EXTRA -If you want to learn about Brain development foods for Babys , please visit this article.
Step 2: Choose Your Quilt Pattern
- Decide on a style: patchwork, appliqué, minimalist, or memory quilt.
- Plan the size (standard baby quilts are around 30–40 inches square).
- Sketch a simple layout on paper or use an online template to visualize the design.
Step 3: Cut and Arrange Fabric
- Cut fabric pieces according to your chosen pattern.
- Arrange squares or shapes on a flat surface to see how the colours and patterns look together.
- Adjust until you’re happy with the layout before sewing.
Step 4: Sew the Quilt Top
- Start sewing your fabric pieces together using a straight stitch.
- Sew row by row for patchwork quilts, or attach appliqué pieces to a solid background.
- Press seams flat with an iron to make the quilt top neat.
Step 5: Assemble the Quilt
- Layer the quilt top, batting, and backing fabric (wrong side up).
- Pin or clip the layers together to prevent shifting.
- Baste the layers with temporary stitches or spray adhesive if needed.
Step 6: Quilt and Finish
- Quilt the layers together using straight or decorative stitching — either by machine or hand.
- Trim any excess batting or backing fabric.
- Bind the edges using bias tape or folded fabric for a clean, finished look.
✨ Quick Tip: Take your time — sewing a quilt is a creative journey. Start with simple designs and gradually explore more complex patterns as your skills improve.
Safety Tips for Baby Quilts
Baby quilts are a cozy addition to your nursery, but safety should always come first. Choosing the right materials, such as breathable cotton and hypoallergenic fabrics, helps prevent allergies and discomfort. Always ensure the quilt is lightweight and appropriately sized for your baby’s crib or bassinet to reduce the risk of suffocation or injury. Avoid quilts with loose threads, buttons, or embellishments that could be choking hazards. Regular washing and inspecting for wear and tear keeps the quilt clean and safe for daily use. By following these simple guidelines, parents can ensure their baby stays warm, comfortable, and protected while enjoying the soft comfort of a quilt.
Creative Ideas to Personalize Your Baby Quilt
While baby quilts are beautiful and cozy, keeping safety in mind is essential, especially for infants. Here’s how to ensure your handmade quilt is both safe and functional:
1. Avoid Small Embellishments
- Do not use buttons, beads, or sequins that could come loose and pose a choking hazard.
- Stick to appliqué shapes sewn flat onto the quilt instead of raised or detachable decorations.
2. Choose Baby-Safe Fabrics
- Use 100% cotton or other breathable, non-toxic fabrics.
- Avoid synthetic materials that could cause overheating or skin irritation.
- Wash fabrics before sewing to remove chemicals and shrinkage.
3. Keep Quilts Out of the Cot for Infants
- For babies under 12 months, never place quilts in the cot during sleep — this can increase the risk of suffocation.
- Use quilts for tummy time, stroller blankets, or nursery décor instead.
4. Make It Washable
- Babies can be messy, so choose fabrics and batting that are machine-washable.
- Use safe, fragrance-free detergent to avoid irritating sensitive baby skin.
5. Secure Layers Properly
- Ensure batting, quilt top, and backing are stitched or basted securely to prevent shifting.
- Loose layers or fraying edges can create hazards over time.
✨ Quick Tip for Teen Parents: When in doubt, keep it simple. A soft, flat, and breathable quilt without extra embellishments is safest and still looks adorable.
you can read more about Baby Quilt Pattern https://sewcanshe.com/free-baby-quilt-patterns/by visit this article
Conclusion & Call-to-Action
Creating a baby quilt is more than just a craft project — it’s a way to express love, creativity, and care for your little one. For teen parents, using beginner-friendly baby quilt patterns makes it easy to start, even if you’ve never sewn before. From simple patchwork squares to personalized appliqué designs, each quilt becomes a treasured keepsake that your baby (and you!) will cherish for years.
Remember, quilting doesn’t have to be perfect. It’s the thought, effort, and creativity that count. Start small, experiment with patterns, and enjoy the process of making something special for your baby.
👉 Call-to-Action: Try your first baby quilt today! Share your creations, tips, or experiences in the comments below, and subscribe to our blog for more DIY baby projects, creative parenting tips, and fun baby craft ideas.